In honour of our #STEAMGreen theme this year and our Canada Wide Experiment: Million Tree Program‘s Seed Collection, what better way to celebrate Halloween than collecting their seeds to grow our own pumpkins the next year! Thankfully, growing this fruit from seed collection to harvesting is relatively easy — we just need the gardening space!
With the vide variety of pumpkins to choose from, you’re bound to find a pumpkin that fits your decor, and maybe even culinary, needs! There are miniature pumpkins, such as Jack Be Little, We-B-Little and Munchkin pumpkins, which are very productive and easy to grow, or giant pumpkins like Dill’s Atlantic Giant that need lots of space and longer to grow. If you’re looking for the perfect Jack-o’-Lantern pumpkin, Autumn Gold has proven to be great to carve. Pumpkin pies are delicious made with pumpkins such as Sugar Treat, Hijinks, Baby Bear, Cinderella’s Carriage and Peanut Pumpkins. For a splash of colour in your pumpkin decor, you can get more colourful pumpkins, like the blue-green Jarrahdale, the orange and green Pepitas Pumpkin and the large white pumpkin, Super Moon.

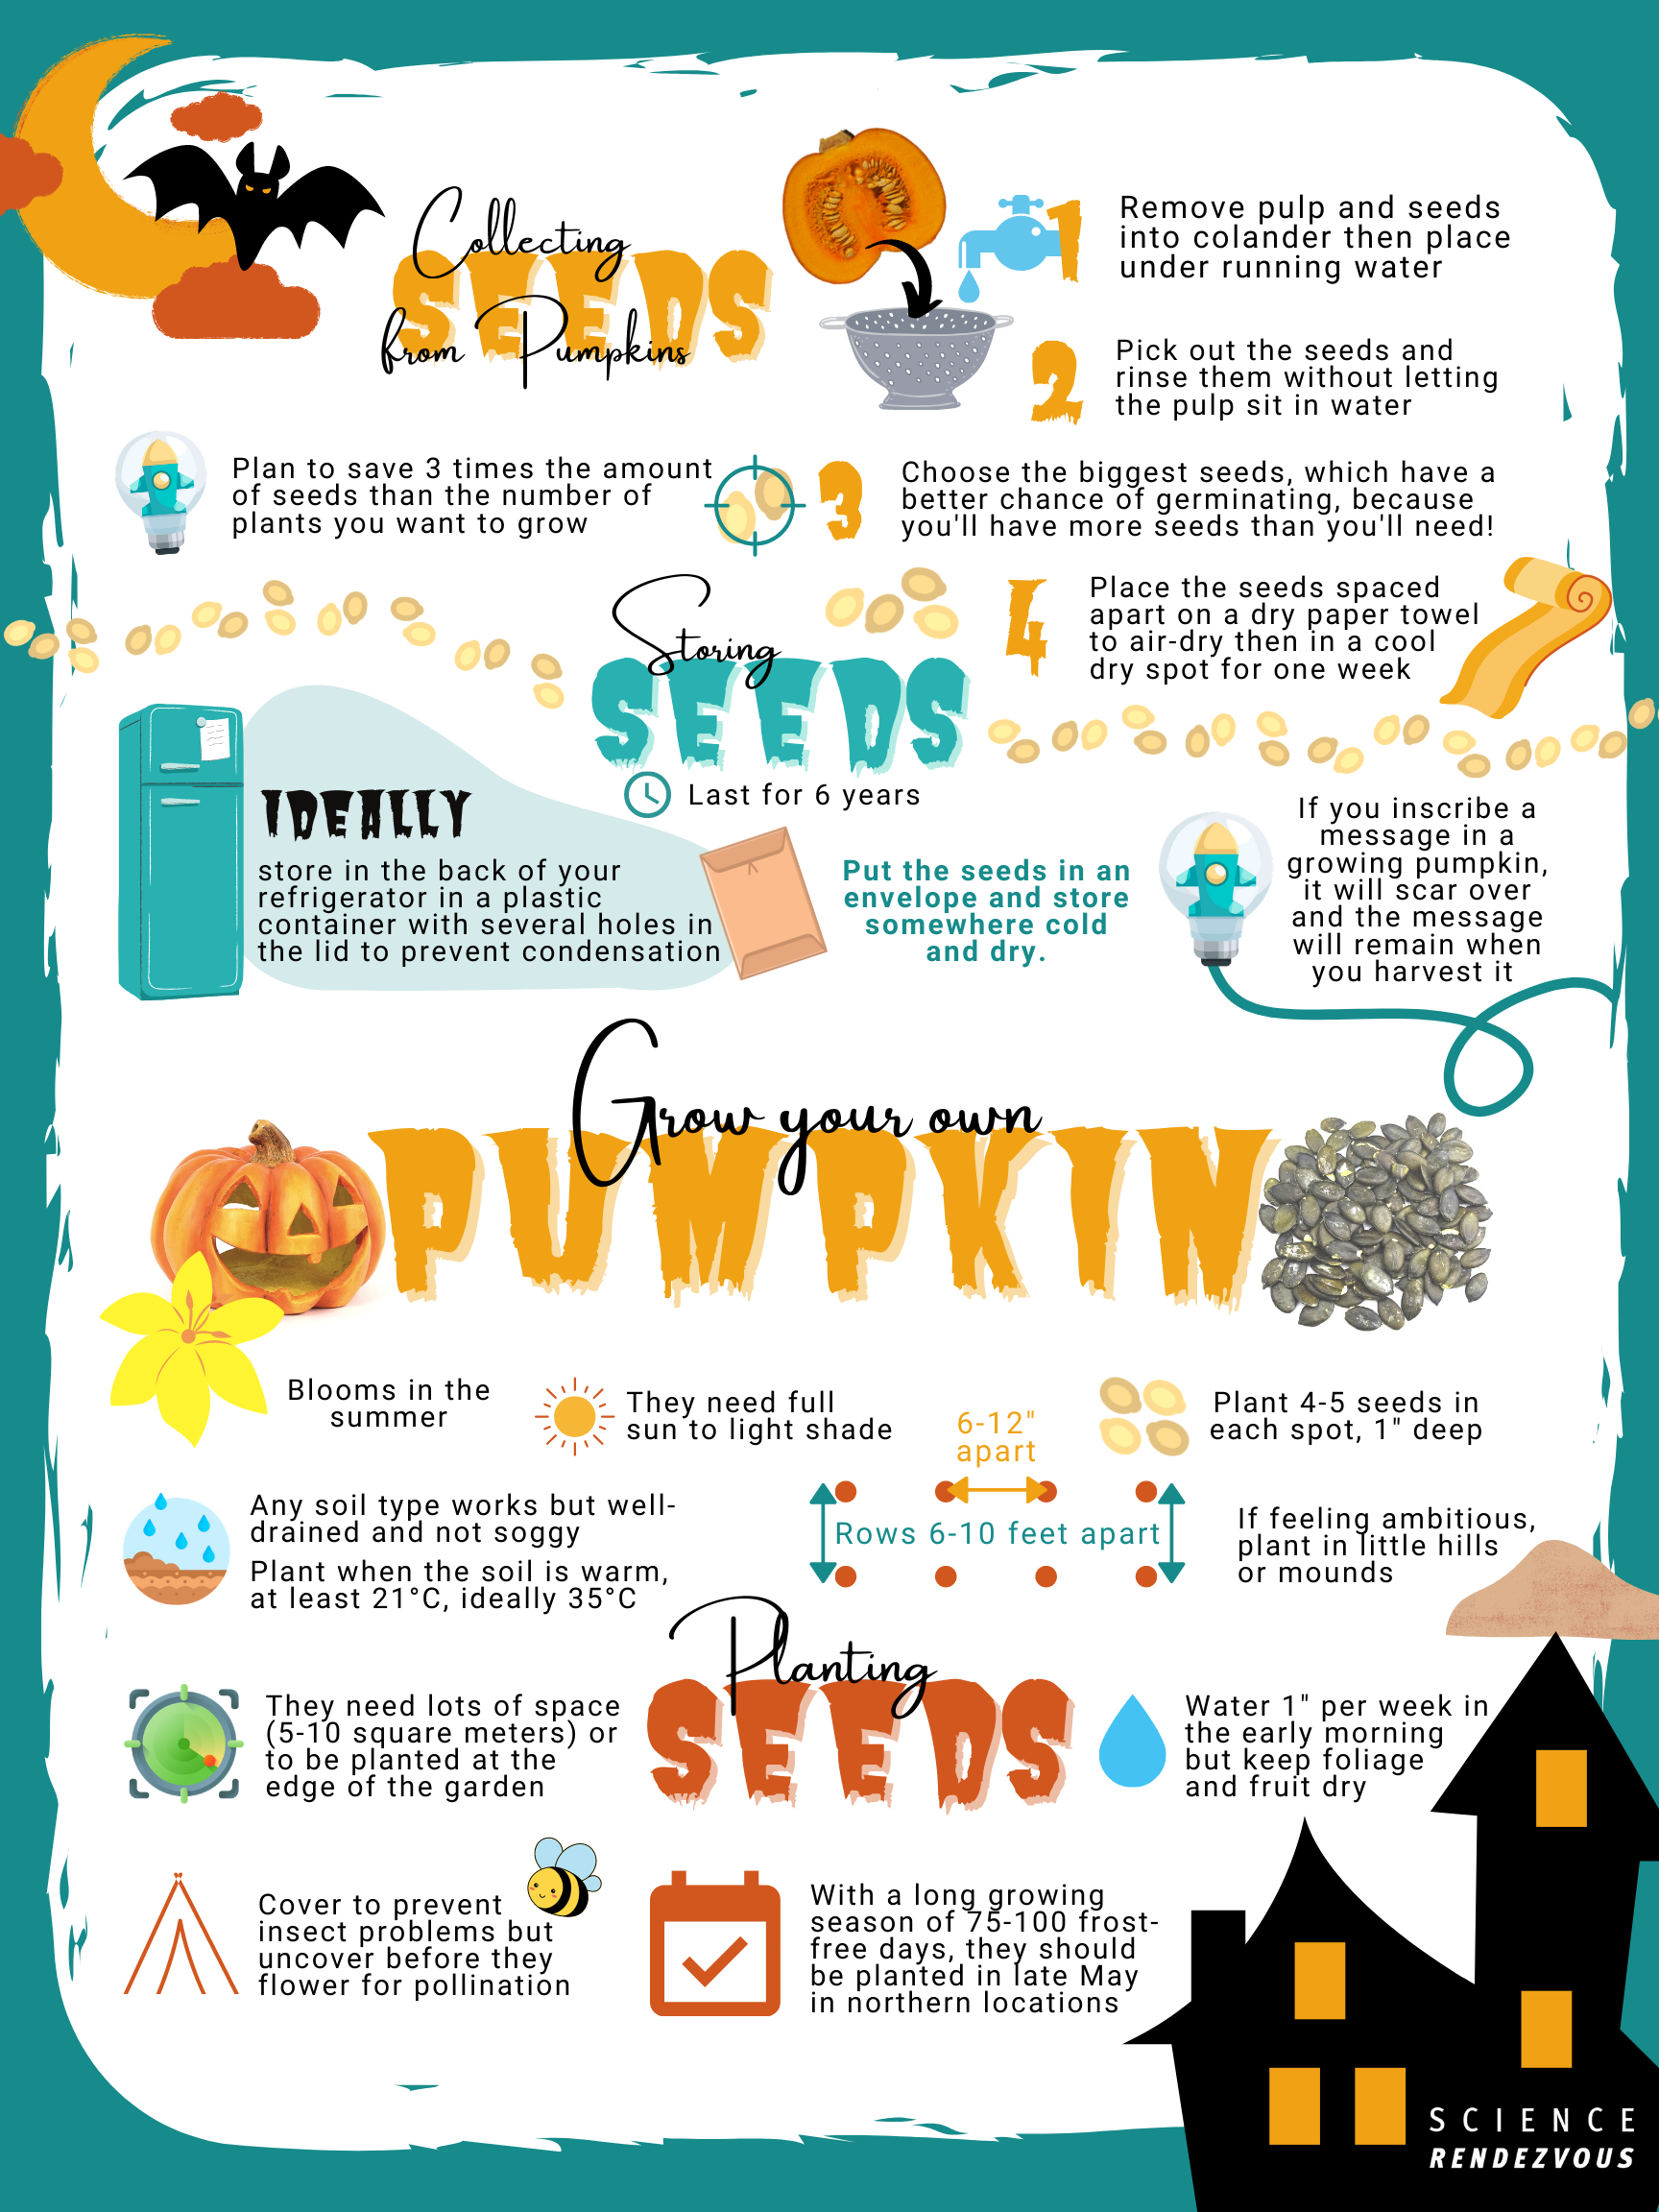
Collecting Seeds
- Remove the pulp and seeds from inside the pumpkin into a colander.
- Place the colander under running water and start picking out the seeds from the pulp.
- Rinse the seeds and don’t let the pulp sit in non-running water.
- You’ll definitely get more seeds than you’ll need so choose the biggest seeds, which have a better chance of germinating.
- Plan on saving three times more seeds than the number of plants you plan to grow.
- Place the rinsed seeds on a dry paper towel to air-dry and make sure they are spaced out so they don’t stick to each other.
- Place in a cool dry spot for one week or so.
Storing Seeds
- Store the seeds in an envelope somewhere cold and dry.
- Ideally, store the envelope in a plastic container with several holes in the lid, which prevent condensation, in the back of your refrigerator.
Planting Seeds
- Pick a spot with lots of sunlight or light shade, and lots of space. Or, it could be the edge of your garden, where you can direct the vines. Any soil type is good, as long as it’s well-drained and not too soggy.
- Pumpkins need 75-100 frost-free days, depending on the variety, and so in northern locations, they need to be planted by late May.
- If the growing season isn’t long enough where you are, you can also seed them indoors in peat pots 2-4 weeks before the last frost.
- Prepare your site by mixing compost and manure 12-15 inches into the ground. No manure? No problem! Loosen the soil and mix in 2 to 4 inches layer of compost. Use weed block or natural weed-killers two weeks ahead to clear out the area.
- Pumpkins are sensitive to the cold so make sure there is no danger of frost and that the soil is warm, at least 21°C, ideally 35°C.
- Plant 4-5 seeds 1 inch deep into the ground in rows. If you’re feeling ambitious, you can create “pumpkin hills,” which are similar to small pitcher mounds.
- Plant the seeds 6-12 inches apart in rows 6-10 feet apart.
- Seeds will germinate in less than a week and emerge in 5-10 days.
Growing Pumpkins
Fun fact: If you inscribe messages on growing pumpkins with a large nail, it will scar over while the pumpkins grow and will still be visible when you harvest them!
- Pumpkins are thirsty so make sure to water 1 inch each week early in the morning, while keeping foliage and fruit dry unless it’s a sunny day.
- Cover the plants to prevent insect problems in their early growing stages.
- When the plants are 2-3 inches tall, snip off unwanted plants without disturbing the roots to ensure each hill or spot only has 2-3 plants each. The pumpkin will grow larger if you keep it to only one per vine.
- Before the pumpkins start to flower, uncover them to allow for pollination.
- When the plants are 1 feet tall before the vines come in, fertilize regularly with high nitrogen formulas.
- As the vines begin to show and the plant starts to bloom, fertilize regularly with high phosphorous formulas.
- Add mulch around pumpkins to keep in moisture, suppress weeds and discourage pests. You can even place a thin board, heavy cardboard or grass clippings to further avoid decay, insect damage, regulate soil temperature.
- After a few pumpkins have formed, pinch off the fuzzy ends of each vine to stop its growth so that the plant’s growth will be focused on the fruit.
It’s okay if the first flowers don’t form fruits – this is normal!
Extra Growing Tips
- Regularly treating the plants with manure or compost mixed with water will help their growth.
- Be gentle with delicate pumpkin vines because damaged vines can reduce the quality of the resulting pumpkin.
- Bees are essential for pollination so you can attract more bees with a bee house in your garden.
- For an even shape, turn the fruit with care as it develops.
- For more colour, remove leaves that are shading the plant a few weeks before harvest.
- A common pest is mildew, an airborne fungal disease that usually affects pumpkins at the end of their growing season. Home sprays in 7-10 intervals may help, consisting of either 1 tsp of baking soda and 1 litre of water with a squirt of dish soap or 1 part milk to 9 parts water.
Harvesting Pumpkins
- A pumpkin is ripe when its skin is deep, solid colour, its skin is tough, and the stem is dry and beginning to shrivel.
- Wear gloves and cut the fruit off the vine carefully with a sharp knife or pruners, but make sure not to tear and give the stem 3-4 inches.
- Keep pumpkins in the sun for about a week to toughen the skin and then store them in a cool, dry bedroom or cellar.
Resources
- Pumpkin: A Brief History, University of Missouri
- Pumpkins and More, University of Illinois
- Growing Pumpkins, The Old Farmer’s Almanac
- Saving Pumpkin Seeds, Gardening Know How
- Everything You Need to Know to Grow Pumpkins From Pumpkin Seeds, Real Simple
- How to Grow Pumpkins, West Coast Seeds
- How to Grow a Pumpkin Plant in Your Garden This Fall, Good Housekeeping
- Planting Pumpkin Seeds, HGTV
- How To Grow Pumpkins With Kids, Megan Zeni
- How to Grow Your Own Pumpkins, Gardener’s Path
- Pumpkins, Gardener’s Supply Company
- Planting Pumpkin Seeds 101, Country Living